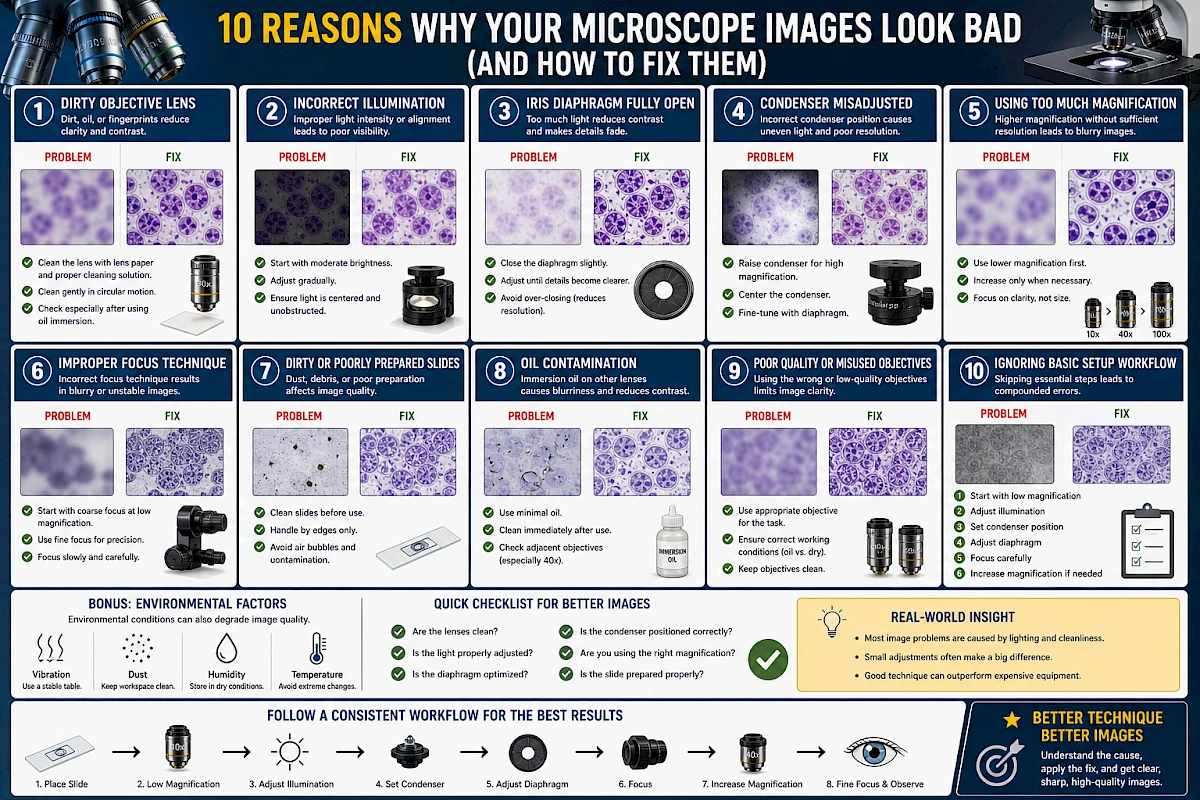
10 Reasons Why Your Microscope Images Look Bad (And How to Fix Them)
If your microscope images look blurry, dark, washed out, or simply unclear, the problem is usually not the microscope itself.
In most cases, poor image quality comes from incorrect setup, improper technique, or simple maintenance issues.
This guide breaks down the most common reasons why microscope images look bad—and exactly how to fix each one.
1. Dirty Objective Lens
Symptoms
- Blurry image
- Reduced contrast
- Hazy appearance
Why It Happens
Dust, oil, or fingerprints on the objective lens scatter light and degrade image quality.
How to Fix It
- Use lens paper and proper cleaning solution
- Clean gently in circular motion
- Check especially after using immersion oil
2. Incorrect Illumination
Symptoms
- Image too dark or too bright
- Uneven lighting
- Washed-out details
Why It Happens
Improper light intensity or misaligned illumination disrupts contrast and visibility.
How to Fix It
- Start with moderate brightness
- Adjust gradually
- Ensure light is centered and unobstructed
3. Iris Diaphragm Fully Open
Symptoms
- Low contrast
- Flat-looking image
- Difficult to see fine structures
Why It Happens
A fully open diaphragm allows too much light, reducing contrast.
How to Fix It
- Close the diaphragm slightly
- Adjust until details become clearer
- Avoid over-closing (which reduces resolution)
4. Condenser Misadjusted
Symptoms
- Uneven illumination
- Poor resolution
- Lack of sharpness
Why It Happens
The condenser controls how light is focused on the sample. Incorrect positioning reduces optical performance.
How to Fix It
- Raise condenser for high magnification
- Center it if adjustable
- Fine-tune with diaphragm
5. Using Too Much Magnification
Symptoms
- Large but blurry image
- No additional detail
- Difficult focusing
Why It Happens
Higher magnification without sufficient resolution leads to “empty magnification.”
How to Fix It
- Use lower magnification first
- Increase only when necessary
- Focus on clarity, not size
6. Improper Focus Technique
Symptoms
- Image never fully sharp
- Difficulty locating sample
- Constant refocusing
Why It Happens
Incorrect use of coarse and fine focus leads to unstable or inaccurate focusing.
How to Fix It
- Start with coarse focus at low magnification
- Use fine focus for precision
- Focus slowly and carefully
7. Dirty or Poorly Prepared Slides
Symptoms
- Spots or debris in image
- Low contrast
- Unclear structures
Why It Happens
Dust, fingerprints, or poor sample preparation affect visibility.
How to Fix It
- Clean slides before use
- Handle by edges only
- Avoid air bubbles and contamination
8. Oil Contamination
Symptoms
- Blurred image
- Light scattering
- Reduced contrast
Why It Happens
Immersion oil spreads to other objectives or dries on the lens.
How to Fix It
- Use minimal oil
- Clean immediately after use
- Check adjacent objectives (especially 40×)
9. Poor Quality or Misused Objectives
Symptoms
- Low resolution
- Distorted image
- Inconsistent performance
Why It Happens
Using the wrong objective or low-quality optics limits image clarity.
How to Fix It
- Use appropriate objective for the task
- Ensure correct working conditions (oil vs dry)
- Keep objectives clean
10. Ignoring Basic Setup Workflow
Symptoms
- Inconsistent results
- Frequent adjustment issues
- Poor overall image quality
Why It Happens
Skipping essential setup steps leads to compounded errors.
How to Fix It
Follow a consistent workflow:
- Start with low magnification
- Adjust illumination
- Set condenser position
- Adjust diaphragm
- Focus carefully
- Increase magnification if needed
Bonus: Environmental Factors
Sometimes the issue is not the microscope itself.
Possible Factors
- Vibration from unstable table
- High humidity causing lens issues
- Dusty environment
- Temperature fluctuations
Solutions
- Use a stable surface
- Store in dry conditions
- Keep workspace clean
Quick Checklist for Better Images
Before blaming your microscope, check:
- Are the lenses clean?
- Is the light properly adjusted?
- Is the diaphragm optimized?
- Is the condenser positioned correctly?
- Are you using the right magnification?
- Is the slide prepared properly?
Real-World Insight
In practice:
- Most image problems are caused by lighting and cleanliness
- Small adjustments often make a big difference
- Good technique can outperform expensive equipment
Conclusion
Poor microscope images are usually not a hardware problem—they are a setup problem.
By understanding the common causes and applying simple corrections, you can dramatically improve image clarity, contrast, and detail.
Better technique leads directly to better results.