Optical Microscope Maintenance: Best Practices for Long-Term Performance
A high-quality optical microscope can deliver reliable performance for many years—but only if it is properly maintained. Poor handling, incorrect cleaning, or neglect can quickly degrade image quality, damage optical components, and lead to costly repairs.
This guide focuses on practical, real-world maintenance techniques to help extend the lifespan of your microscope and ensure consistent imaging results.
1. Why Maintenance Matters
Microscopes are precision optical instruments. Even small amounts of dust, oil, or misalignment can significantly affect performance.
Proper maintenance helps to:
- Preserve image clarity and contrast
- Prevent permanent lens damage
- Reduce downtime and repair costs
- Ensure consistent and reproducible results
- Extend equipment lifespan
Neglect, on the other hand, often leads to issues that are avoidable.
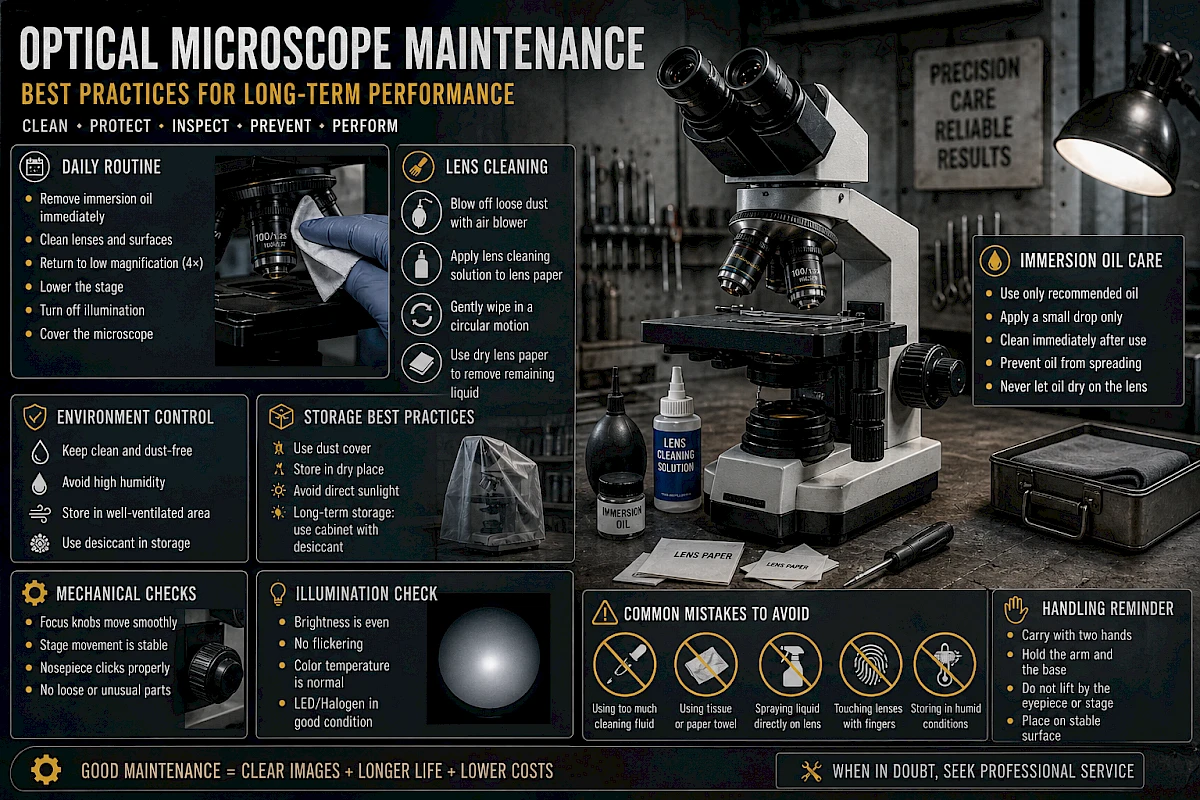
2. Daily Maintenance Routine
Clean After Each Use
After every session:
- Remove any immersion oil immediately
- Check objective lenses for residue
- Wipe visible dust from external surfaces
- Turn off illumination and allow cooling (if using halogen)
Leaving oil or contaminants on the microscope—even overnight—can cause long-term damage.
Cover the Microscope
Always use a dust cover when the microscope is not in use.
Dust is one of the most common causes of degraded image quality. Even in clean environments, airborne particles settle over time.
Return to Safe Position
Before storing:
- Rotate to the lowest magnification objective (usually 4×)
- Lower the stage completely
- Remove any slides from the stage
This reduces the risk of accidental contact between lens and stage.
3. Weekly and Periodic Maintenance
Inspect Optical Surfaces
Check eyepieces and objectives for:
- Dust
- Oil residue
- Smudges
- Dry stains
Even minor contamination can reduce image sharpness.
Check Mechanical Components
Ensure that:
- Focus knobs move smoothly
- Stage movement is stable and precise
- Nosepiece clicks properly into position
If movement feels stiff or loose, it may require professional servicing.
Verify Illumination
Look for:
- Uneven brightness
- Flickering light
- Color shifts
These may indicate issues with the light source or electrical components.
4. Proper Lens Cleaning Techniques
Use Correct Materials Only
Never use:
- Paper towels
- Facial tissues
- Clothing
- Cotton swabs (unless specifically designed for optics)
Approved materials include:
- Lens paper
- Optical cleaning wipes
- Microfiber cloths designed for optics
Using the wrong material can scratch lens coatings.
Cleaning Procedure
- Blow off loose dust using an air blower
- Apply a small amount of lens cleaning solution to lens paper
- Gently wipe the lens in a circular motion
- Use a dry section of lens paper to remove remaining liquid
Never apply liquid directly onto the lens.
Cleaning Frequency
Clean only when necessary. Over-cleaning can also damage coatings.
5. Handling Immersion Oil Correctly
Use Only Recommended Oil
Microscope immersion oil is specially formulated. Do not substitute with other oils.
Apply Minimal Amount
Use just one small drop. Excess oil can spread to other objectives and components.
Clean Immediately After Use
After using a 100× oil immersion objective:
- Wipe off oil with lens paper
- Use cleaning solution if needed
- Check nearby objectives for contamination
Oil can easily transfer when switching objectives.
Avoid Oil Drying
Dried oil becomes sticky and difficult to remove. It may require professional cleaning if neglected.
6. Preventing Dust and Contamination
Control the Environment
- Avoid placing microscopes near open windows
- Keep away from high-traffic or dusty areas
- Maintain clean working surfaces
Use Air Blowers Instead of Wiping
Dust particles can scratch lenses if wiped directly. Always remove loose dust first with an air blower.
Keep Slides Clean
Dirty slides are a major source of contamination.
- Handle slides by the edges
- Avoid touching the cover glass
- Store slides in clean containers
7. Electrical and Illumination Care
LED Systems
LED light sources require minimal maintenance but should still be checked periodically for:
- Stability
- Brightness consistency
Halogen Systems
For halogen lamps:
- Avoid touching the bulb with bare hands
- Replace bulbs when brightness decreases or flickering occurs
- Allow cooling before handling
Power Management
- Turn off the microscope when not in use
- Avoid frequent on/off cycles in short intervals
- Use stable power sources where possible
8. Storage Best Practices
Short-Term Storage
For daily use environments:
- Cover the microscope
- Keep in a dry, clean room
- Avoid direct sunlight
Long-Term Storage
If storing for extended periods:
- Place in a sealed cabinet if possible
- Use silica gel or desiccants to control humidity
- Avoid extreme temperatures
Humidity can lead to fungal growth on lenses, which is difficult and sometimes impossible to remove completely.
9. Preventing Fungal Growth
Fungus is a serious threat in humid environments.
To prevent it:
- Keep humidity below 60%
- Use dehumidifiers if necessary
- Store in well-ventilated areas
- Use desiccants in storage cabinets
Signs of fungal contamination include:
- Cloudy or web-like patterns on lenses
- Reduced contrast
- Permanent image degradation
Once fungus spreads inside optical components, professional servicing is required.
10. Safe Handling Practices
Carrying the Microscope
Always carry with two hands:
- One hand holding the arm
- One hand supporting the base
Never lift by the eyepiece or stage.
Avoid Sudden Movements
- Do not tilt unnecessarily
- Avoid vibration or impact
- Place on stable surfaces
Protect the Optics
- Never touch lenses with fingers
- Avoid pointing the microscope toward strong light sources when not designed for it
11. Common Maintenance Mistakes
Using Too Much Cleaning Fluid
Excess liquid can seep into lens assemblies and damage internal components.
Ignoring Small Contamination
Minor oil or dust can accumulate over time and become harder to remove.
Using Improper Tools
Improvised cleaning tools often cause more harm than good.
Forgetting Adjacent Objectives
Oil from the 100× objective can transfer to 40× or 10× objectives if not cleaned carefully.
Storing in Humid Environments
Humidity damage is often irreversible and costly.
12. When to Seek Professional Service
Some issues require expert attention:
- Internal dust or fungus inside objectives
- Misalignment of optical components
- Loose or unstable stage
- Focus mechanism failure
- Electrical problems
Do not attempt to disassemble the microscope unless you are trained to do so.
13. Maintenance Checklist
After Each Use
- Remove immersion oil
- Clean visible surfaces
- Turn off light
- Cover microscope
Weekly
- Inspect lenses
- Check stage movement
- Verify illumination
Monthly
- Deep clean external surfaces
- Check all objectives carefully
- Inspect storage environment
Annually
- Professional inspection (recommended for heavy use environments)
14. Practical Tips from Experience
- A clean lens often improves image quality more than increasing magnification
- Most “blurry image” issues are caused by dirt, not defective optics
- Less cleaning is better than improper cleaning
- Prevention is easier than repair
- A simple dust cover is one of the most effective protective tools
Conclusion
Microscope maintenance is not complicated, but it requires consistency and attention to detail.
By following proper cleaning methods, controlling the environment, and handling the instrument carefully, you can preserve both optical performance and mechanical reliability for years.
Good maintenance is not just about protecting equipment—it directly improves observation quality and ensures dependable results in every use.